

2025-03-19
Can You Cut LED Strip Lights And How To Connect LED Strip Lights?
Can You Cut LED Strip Lights And How To Connect LED Strip Lights?
LED light strips have revolutionized modern lighting and have become a top choice for DIY enthusiasts and professionals alike. The flexibility, energy efficiency, and customizable design of LED tape light make them perfect for everything from accent lighting to creative projects. But there's one question that confuses many users: can you cut LED light strips? If so, how to cut and connect LED strip lights?
The answer is yes—most LED lights strips are designed to be cut! Below is a concise guide to address these queries.
Can You Cut LED Strips?
How To Cut LED Strip Lights?
Where To Cut LED Strip?
Can You Cut LED Strip Lights Anywhere?
How Do I Know If I Can Cut My LED Strip Lights?
How To Connect LED Strips?How To Bend LED Strip?
How Do Strip Lights Work? How To Install LED Strip Lights?
Wrapping Up
Can You Cut LED Strips?
I find that the ability to cuttable LED strip lights is a major advantage, allowing for flexible installation. Most LED light strip can be trimmed to the desired length, making LED tape ideal for fitting into a variety of spaces, such as cabinets, shelves, wall, or behind a TV.
ADLED's standard length of LED strips is 5 meters per roll. What if your project only requires 1 meter or less? Or a lamp is not lighting up in an already installed lighting project, how to replace LED strips?
Generally, most LED lighting strips can be cut, but they must be cut only along the designated cutting lines to ensure that they continue to work properly. Finding these cutting points seems simple. They are usually indicated by markings printed directly on the lightstrip, such as dotted lines or scissor icons. They are usually located in the interval area of every 3-6 LEDs. Cutting vertically with sharp scissors will ensure that the circuit is complete. Always disconnect the strip lights LED from the LED tape power supply before attempting any cuts. Also, care should be taken to avoid cutting any wires or other components on the LED strip lighting.
Interestingly, I learned that cuttable LED strips can be reused, and LED light strip connectors can be used to connect the cut sections. Soldering is another option for reconnection, but it requires more technical skills and safety precautions.
Note: The LED tape lighting without cutting marks cannot be cut. Cutting the LED strip light in the wrong place will damage the circuit and the LED will not light up. Therefore, be careful when cutting the dimmable LED strip lights. Be sure to turn off the power before operation. Keep the cut flat, and you can achieve personalized size adaptation and easily create the ideal light effect!
How To Cut LED Strip Lights?
LED tape lights offer remarkable versatility, transforming spaces with customizable lighting. A key feature is LED lighting strips ability to be cut to precise lengths, ensuring a perfect fit for any project. However, it's crucial to understand that not all best LED light strips are designed for cutting, and even those that are must be cut at designated points.
Before proceeding, confirm your strip lighting's cutability via the LED tape light manufacturers's instructions or packaging. Look for markings like scissor icons, dashed lines, or exposed metal pads at regular intervals. Cutting anywhere outside these points can damage the circuitry and render the LEDs inoperable.
1. Identifying the Designated Cutting Points: Your Key to Success
The ability to cut LED light strip relies on their design, which incorporates specific cutting points at regular intervals. These points are strategically placed to safely interrupt and continue the electrical circuit. Identifying these correct cutting points is paramount. Look for these visual cues:
Copper Pads
These are small, exposed metallic squares or rectangles appearing in pairs at regular intervals. They are connection points for the electrical current. The designated cutting point is usually in the middle or immediately adjacent to these pads.
Cut Line
Typically a thin, often dotted line printed across the best LED strip lights's width, situated between the copper pads. This line precisely indicates where to cut.
Scissor Icon
Some LED strip manufacturer china print a clear and easily recognizable scissor icon on the best strip lighting at the designated cutting points.
Crucially, cut only at these marked locations. Cutting anywhere else will sever vital electrical connections, causing LEDs to fail and potentially rendering sections unusable – a very common and frustrating mistake. While cutting points are often between individual LEDs, the spacing can vary (every two or three LEDs). Carefully examine your top rated LED strip lights to identify the pattern. Always prioritize the manufacturer's instructions or product packaging as the most reliable source for model-specific cutting point information.
2. Preparation is Paramount: Setting Yourself Up for a Perfect Cut
Measure the Installation Area
Use a ruler or measuring tape for the exact length needed. Accurate measurement prevents cutting too short (requiring a replacement) or creating unnecessary waste.
Mark the Desired Cutting Point
Carefully transfer the required length onto the bendable LED strip lighting, ensuring your mark aligns precisely with a designated cutting point. A clear mark serves as your visual guide.
Disconnect the Power Source
This is the most critical safety step! Before touching any tools, ensure the LED strip lights rohs is completely unplugged from the wall outlet or any battery packs. Working on powered electrical components carries a risk of electric shock, even with low voltage light strips. Accidental short circuits during cutting can also damage the 16 foot LED strip lights or power supply.
3. Making the Cut: Precision and the Right Tools
Choose the Right Tools
Sharp Scissors: Sufficient for most standard cuttable LED strip lighting.
Utility Knife (with a sharp blade): More effective for thicker or waterproof LED light strip.
Precision Cutters/Side Cutting Snips: Recommended for the cleanest, most precise cuts, especially on best high density LED strip lights.
Crucially, ensure your tool is sharp. Dull tools can crush the LED wardrobe strip lights, create uneven edges, and damage internal wiring. A clean cut is vital for functionality and future reconnection.
Make the Cut
Hold the LED LED strip firmly on a stable, flat surface. Align your sharp tool precisely with the marked cut line, cutting directly between the copper pads or on the scissor icon. Apply steady, even pressure for a clean, straight cut through the entire width. Avoid bending or twisting the LED surface mount strip light. A smooth, continuous motion is best.
Inspect the Cut Edge
Examine the newly cut edge for cleanliness and any visible damage to copper pads or surrounding components. Early inspection helps identify potential issues.
Choosing Your Cutting Tool: A Quick Guide
|
Tool
|
Description
|
Pros
|
Cons
|
|
Sharp Scissors
|
Standard household scissors with sharp blades.
|
Readily available, easy to use for most standard premium LED strips.
|
May not be ideal for thicker or outdoor waterproof LED strip.
|
|
Utility Knife
|
Knife with a retractable blade, offering more control.
|
Provides more leverage and control, good for thicker china strip.
|
Requires more caution, can potentially damage the premium LED strip lights if not careful.
|
|
Precision Cutters/Side Snips
|
Specialized tools for clean, precise electronic cuts.
|
Offer the cleanest and most precise cuts, ideal for high-density.
|
Offer the cleanest and most precise cuts, ideal for high-density.
|
4. Safety First: Essential Precautions
Disconnect the Power: Absolutely essential! Always unplug the flexible PCB LED strip before cutting.
Handle Sharp Tools Carefully: Exercise caution to avoid personal injury. Cut away from yourself and keep fingers clear.
Avoid Cutting Through Wires or Circuitry: Cut only at designated points, where no critical components are present.
Work on a Stable Surface: Ensure the interior light strips is flat and well-supported to prevent movement during cutting.
Consider Safety Gear: Gloves for better grip and safety goggles for eye protection are recommended.
5. Cutting Different best type of LED strip lights: Special Considerations
Waterproof Outdoor LED Light Strips
These have a protective silicone or epoxy layer. The cutting process is the same, but resealing the cut end is crucial to maintain water resistance. Use waterproof silicone glue/sealant, silicone end caps, or heat shrink tubing (especially for reconnections). You may need to carefully expose the copper pads for reconnection.
High Density LED Strip Lights
With more LEDs per inch, cutting points may be closer together. Use very sharp and precise tools (new utility knife blade or precision cutters) to avoid damaging nearby components. Precision is key here.
6. Common Mistakes to Avoid: Preventing Damage and Frustration
Be aware of these frequent errors:
Cutting outside designated lines (will likely damage LEDs or circuitry).
Forgetting to disconnect power (shock risk and potential cuttable LED light strips damage).
Using dull tools (uneven cuts and potential PCB LED strip damage).
Bending or twisting the china flexible LED strip while cutting (can damage internal components).
Cutting through solder pads or LEDs (always cut between pads).
Not sealing cut ends of LED strip lights outdoor waterproof (compromises water resistance).
Forgetting to disconnect power (shock risk and potential cuttable LED light strips damage).
Using dull tools (uneven cuts and potential PCB LED strip damage).
Bending or twisting the china flexible LED strip while cutting (can damage internal components).
Cutting through solder pads or LEDs (always cut between pads).
Not sealing cut ends of LED strip lights outdoor waterproof (compromises water resistance).
7. Handling and Reconnecting Cut Ends: Extending Your Lighting Possibilities
After cutting, you can either insulate the cut end or reconnect the sections.
Insulating Cut Ends
For non waterproof LED strip lights in dry environments, insulating exposed copper pads with electrical tape protects against dust and short circuits.
Reconnecting Cut Sections
LED Strip Connectors (Solderless): Various types (straight, L, T, wire connectors). Open the clip, insert the cut end (aligning copper pads and polarity), and close to secure. Only works if cut at a designated cutting point.
Soldering: Provides a permanent and secure connection. Apply solder to copper pads (and connecting wires), then use a soldering iron to join them, ensuring correct polarity. Requires experience and should be insulated with electrical tape or heat shrink tubing.
Soldering: Provides a permanent and secure connection. Apply solder to copper pads (and connecting wires), then use a soldering iron to join them, ensuring correct polarity. Requires experience and should be insulated with electrical tape or heat shrink tubing.

Where To Cut LED Strip?
The ability to cuttable strip lights is a key feature that makes them versatile for various lighting projects. However, it's crucial to cut long strip LED lights correctly to avoid damaging the super long LED strip lights. Here's a comprehensive guide on where to cut LED light strips:
1. Identify Cuttable LED Strips:
Check LED Tape Light Manufacturers Instructions: The most reliable way is to consult the product manual, packaging, or the manufacturer's website. It will explicitly state if the LED strip light china are designed to be cut.
Avoid Cutting Non-Cuttable striplights: high voltage SMD LED strip (110V or 220V) and individually addressable LEDs (like RGBIC) are generally not designed for user cutting. Attempting to cut them can lead to damage.
Avoid Cutting Non-Cuttable striplights: high voltage SMD LED strip (110V or 220V) and individually addressable LEDs (like RGBIC) are generally not designed for user cutting. Attempting to cut them can lead to damage.
2. Locate the Designated Cutting Points:
Manufacturers strategically place cutting points along the linear tape lighting to ensure the electrical circuit remains intact after a cut. Look for these visual cues:
Scissor Icon: A small scissor symbol printed directly on the UL LED strip light.
Cut Lines: Thin, often dotted lines running across the width of the LED flexible tape light.
Copper Pads: Pairs of small, exposed metallic squares or rectangles appearing at regular intervals. The cutting point is usually:
On the designated line: If a scissor icon or dashed line is present.
Between the copper pads: If a dotted line runs between them.
In the center of the pads: If only copper pads are visible without a line.
Cut Lines: Thin, often dotted lines running across the width of the LED flexible tape light.
Copper Pads: Pairs of small, exposed metallic squares or rectangles appearing at regular intervals. The cutting point is usually:
On the designated line: If a scissor icon or dashed line is present.
Between the copper pads: If a dotted line runs between them.
In the center of the pads: If only copper pads are visible without a line.
3. Important Considerations:
Cut ONLY at Marked Locations: Cutting anywhere else will likely sever the electrical connections and damage the LEDs.
Spacing May Vary: While often between every 3 LEDs (for DC12V led strip) or every 6 LEDs (for 24VDC strip light), the spacing of cutting points can differ. Always identify the specific pattern on your linkable strip light.
Spacing May Vary: While often between every 3 LEDs (for DC12V led strip) or every 6 LEDs (for 24VDC strip light), the spacing of cutting points can differ. Always identify the specific pattern on your linkable strip light.
In summary, always look for the designated cutting marks (scissor icons, cut lines, or copper pads) on your connecting LED strip lights and ensure you cut precisely at those points to avoid damaging the functionality of the remaining sections. Consulting the best LED strip manufacturers's instructions is always the best first step.
Can You Cut LED Strip Lights Anywhere?
Excited to customize the length of your new LED strip lights to perfectly fit your project? They look so versatile, you might be wondering if you can just snip them wherever you need. But before you grab those scissors, it's crucial to know if that's the right approach. So, the burning question is: can i cut LED strips anywhere? Let's shed some light on this and ensure your lighting project goes smoothly!
1. Designated Cut Points:
Shenzhen LED strip lights are designed with specific cutting points. These points are typically marked with a scissor icon or a line, and they're located at intervals along the UL LED strip light.
These markings indicate where it's safe to cut without damaging the circuit.
These markings indicate where it's safe to cut without damaging the circuit.
2. Why You Can't Cut Anywhere:
LED strip lights contain circuits that run along the 5m LED strip lighting. Cutting outside of the designated points can break these circuits, causing sections of the continuous LED strip light to stop working.
Therefore, it's crucial to only cut at the indicated locations.
Yes, strip lighting installation are designed to be cut to customize their length.
However, you must only cut them at the designated, marked cutting points.
How Do I Know If I Can Cut My LED Strip Lights?
You've got your new top strip lights in hand, ready to add that perfect glow to your space. You've measured your desired length, and now the question pops into your head: can these LED strips be trimmed to fit? You've probably heard they can be cut, but you want to be absolutely sure before taking the plunge. So, the crucial question is: How do I know if I can cut my LED strip lights? Let's figure out what to look for to ensure you customize your lights correctly!
1. Look for Designated Cutting Points:
Visual Markings: Carefully examine the commercial grade LED strip lights. You should be able to see markings that indicate where it's safe to cut. These are often represented by: a scissor icon, a dotted line and a solid line.
Location: These markings are typically found at regular intervals along the bendable LED light strip.
2. Check the Manufacturer's Instructions:
Documentation: The most reliable source of information is the LED strip manufacturer's documentation. This might be included in the product packaging or available online.
These instructions will provide specific details about whether the white LED strip light can be cut and where.
These instructions will provide specific details about whether the white LED strip light can be cut and where.
Online Resources: If you don't have the physical instructions, try searching for the LED strip's model number online. The manufacturer's website may have a product manual or specifications.
3. Observe the Circuitry:
Solder Pads: The cutting points are usually located between solder pads, which are small metal contacts.
Cutting at these points ensures that you're not interrupting the circuit.
Avoid Cutting Between LEDs: Never cut the dimmable strip light in the middle of an LED or through any visible circuitry, as this will likely damage the DC strip light.
4. Key Considerations:
Safety: Always disconnect the soft strip lighting from the power source before attempting to cut it.
Tooling: Use sharp scissors or a utility knife for clean cuts.
high voltage LED strip: Be extra cautious with high output LED tape. These often require professional installation and may not be designed for cutting.
By following these guidelines, you can determine whether your most customizable LED light strips are cuttable and ensure that you do so safely.
How To Connect LED Strips?
You've got multiple sections of custom size LED strips and a vision for a seamless, illuminated space. But now comes the crucial step: joining these segments together. Whether you're navigating corners, extending a run, or simply need to connect separate pieces, knowing the right way to link your custom made LED strip lights is key to a successful lighting project. So, the essential question is: how do you connect LED strip lights together? Let's explore the various methods and find the best approach for your needs!
1. Using LED Strip Connectors
Solderless Connectors: These are the most user-friendly option. They come in various types (clip-on, fold-over) to match your linkable LED strips's width and the number of conductors (wires).
How they work: You simply slide the cut end of the LED light strip high quality into the connector, ensuring the contacts align. The connector then secures the LED strip bulk, creating an electrical connection.
Advantages: No soldering required, Easy and quick to use.
Key Considerations: Ensure the connector is compatible with your LED light white strips's voltage and width. Pay close attention to polarity (+/-) when connecting. For RGB LED ribbon, align the color-coded wires correctly.
2. Soldering:
For a Secure Connection: Soldering provides a more permanent and reliable connection, especially for long runs or installations in demanding environments.
How it works: You'll need a soldering iron, solder, and basic soldering skills. The process involves heating the contact points on the budget LED strip lights and the wires, then applying solder to create a bond.
| Advantages | Disadvantages |
|
Creates a strong and durable connection.
Reduces the risk of loose connections.
|
Requires soldering skills.
More time-consuming.
Requires proper safety precautions.
|
Key Considerations: Practice soldering on scrap pieces before working on your LED dimmable strip lights. Work in a well-ventilated area. Be very careful to avoid bridging solder between the contact points, which will cause a short.
3. General Connection Tips:
Power Supply: Ensure your power supply's voltage and wattage are compatible with your LED tape light cuttable. Connect the power supply to the bright light LED strip according to the polarity (+/-) markings.
Testing: Before permanently installing the LED light strips low voltage, test the connections to ensure they're working correctly.
Planning: Plan your layout before cutting or connecting any best brand of LED light strips. This will help you to minimize the amount of connections needed.
Planning: Plan your layout before cutting or connecting any best brand of LED light strips. This will help you to minimize the amount of connections needed.
By following these guidelines, you can successfully connect your long run LED strip lights and create your desired lighting effect.
How To Bend LED Strip?
Bend LED strip are known for their flexibility, making them ideal for wrapping around curves and corners. But how much can you actually bend them without causing damage? And are there specific techniques to ensure a smooth, even light output when you do? If you're looking to navigate tricky angles or create flowing illuminated designs, you're probably wondering: How do you bend LED strips? Let's explore the best practices to shape your lights just the way you want them!
1. Understanding LED Strip Flexibility:
Bendable light strips are designed to be flexible, but they have limitations. They bend best along their flat plane. Bending them sharply or against their intended direction can damage the components. The flexibility is influenced by the thickness of LED strip and the density of the LEDs.
2. Gentle Curves:
Long light strip are excellent for creating gradual curves around corners or along curved surfaces. Simply apply gentle, even pressure to the LED strip seamless, guiding it along the desired curve. Avoid kinking or creasing the best brand of LED strip lights. Adhesive Backing: The adhesive backing on most brightest light strips can help them adhere to curved surfaces. Peel off the backing gradually as you bend the 12V LED stripe, ensuring it sticks smoothly.
3. Dealing with Corners:
90-Degree Corners:
Folding (with caution): Some very flexible LED tape can be gently folded at a 90-degree angle. However, this can stress the circuitry, so it's not always recommended.
Using Connectors: The best method for sharp corners is to cut the good cheap LED light strips at the designated cutting point and use L-shaped LED strip connectors. These connectors provide a clean, secure, and reliable 90-degree bend.
Looping: If space allows, create a small, loose loop in the LED stripe white to navigate the corner. This avoids sharp bends.
Other Angles:
For angles other than 90 degrees, flexible connectors that allow for various angles are available.
4. Precautions:
Avoid Sharp Bends: Sharp bends can damage the surface mounted devices(SMD) LEDs and the circuit traces on the flex pcb.
Don't Over-Flex: Exceeding the flex tape lighting's flexibility limit can break the circuitry.
Support and Secure: Once bent, ensure the LED ip rated strip light is properly supported and secured to prevent it from straightening out.
Test After Bending: After bending, test the 12volt strip lights to ensure all LEDs are still working correctly.
Warmth: In colder temperatures, the brightest LED tape light may become less flexible. Warming them slightly with a hair dryer (from a distance) can help, but be careful not to overheat them.
Don't Over-Flex: Exceeding the flex tape lighting's flexibility limit can break the circuitry.
Support and Secure: Once bent, ensure the LED ip rated strip light is properly supported and secured to prevent it from straightening out.
Test After Bending: After bending, test the 12volt strip lights to ensure all LEDs are still working correctly.
Warmth: In colder temperatures, the brightest LED tape light may become less flexible. Warming them slightly with a hair dryer (from a distance) can help, but be careful not to overheat them.
How Do Strip Lights Work?
Good LED strips have become incredibly popular for adding ambiance and accent lighting to just about any space. From subtle under-cabinet glows to vibrant entertainment center backlights, strongest LED strip lights offer a versatile and energy-efficient way to illuminate your world. But have you ever stopped to think about what's actually happening inside those tiny little lights to make them shine? So, let's get down to the basics: how do LED strip lights work when cut?
1. LEDs (Light-Emitting Diodes):
These are the heart of the high end LED strips. LEDs are semiconductor devices that emit light when an electrical current passes through them. Different types of LEDs produce different colors of light. RGB LEDs, for example, can produce a wide range of colors by combining red, green, and blue light.
2. Flexible Circuit Board (PCB):
The LEDs are mounted onto a thin, flexible circuit board. This board contains conductive copper traces that carry the electrical current to the LEDs.
3. Resistors:
These components regulate the amount of current flowing to each LED, preventing them from overheating and ensuring consistent brightness.
4. Power Supply:
Best customizable LED strip lights typically operate on low-voltage DC power (e.g., 12V or 24V). A power supply is required to convert the standard AC household voltage into the appropriate DC voltage.
5. Control (for Color-Changing Strips):
LED RGB strip lights: These smart LED light strip have LEDs that contain red, green, and blue light emitters. By varying the intensity of each color, a wide spectrum of colors can be created. These LED tape light multi color require a controller to send signals to the LEDs to mix the colors.
Addressable LED light strips: These are more advanced. Each LED (or small groups of LEDs) has its own integrated microchip. This allows for individual control of each LED's color and brightness, enabling complex lighting effects like chasing patterns and color gradients. They require a microcontroller to send specific data to each chip.
Spotless LED strip lights work by receiving low-voltage DC power, which then flows through a circuit containing LEDs and resistors. The LEDs illuminate due to electroluminescence. For color changing LED light strips, a controller manages the different color LEDs, and for addressable LED light strip, individual LEDs are controlled by microchips.
How To Install LED Strip Lights?
Tired of bland, boring lighting? Looking to add a splash of color and ambiance to your home or entertainment space? LED bendable strip lights, with their flexibility, ease of installation, and vibrant color options, have become the perfect choice for creating personalized lighting environments. Whether it's cozy bedroom mood lighting, a cool gaming room backdrop, or practical and stylish under-cabinet illumination, LED flexible strip lights can achieve it all with ease. So, the question is: How exactly do you install these magical light strips into your space? Let's explore the steps and tips for installing LED strip lights!
1. Planning and Preparation:
-
Measure and plan: Choose your location: Decide where you want to install the lights (under cabinets, behind TVs, along ceilings, etc.).
-
Measure the space: Determine the exact length of LED strip lights you'll need.
-
Select your adhesive LED strip lights: Consider the color (single color, RGB, addressable), brightness, and voltage (usually 12V or 24V).
-
Gather necessary materials: LED strip lights, Power supply (if your kit doesn't include one or if you need a different one), Controller (for RGB or addressable LED strips), Connectors (if you need to joining LED strip lights together or navigate corners), Scissors Measuring tape, Cleaning cloth and rubbing alcohol.
-
Testing: Before permanently installing anything, unroll the commercial LED tape light and temporarily connect it to the power supply and controller (if applicable) to ensure all components are working correctly.
-
Surface preparation: Clean the surface where you'll be sticking the dimmable LED tape light with a cleaning cloth and rubbing alcohol. This removes dust and grease, allowing the adhesive backing to stick properly. Make sure the surface is completely dry before proceeding.
2. Cutting and Connecting:
-
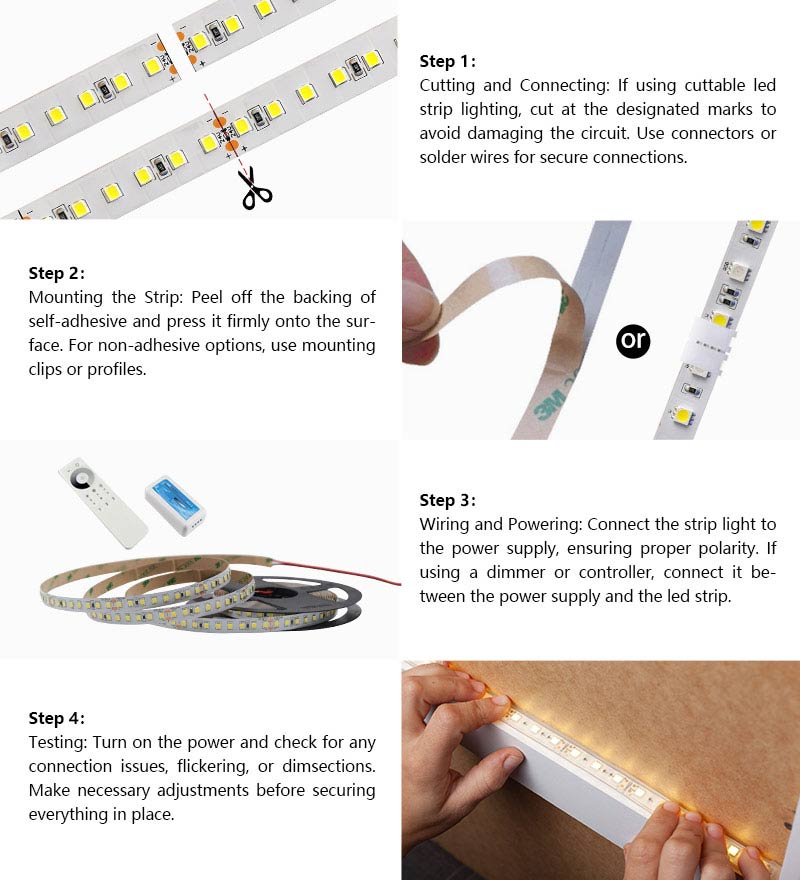
Cut to length: If necessary, cut the commercial strip lighting to the desired length at the designated cutting points. Use sharp scissors or a utility knife for clean cuts.
-
Connect corners and breaks: For corners or breaks in the tape light, use LED strip connectors. Ensure the connectors are compatible with your LED strip's width and number of conductors. If soldering, make sure to properly solder all connections.
-
Connect to power supply: Connect the low voltage tape light to the power supply, paying close attention to polarity (+/-). For RGB or RGBIC LED strips, connect the controller between the best light strips and the power supply.
3. Installation:
-
Peel and stick: Most LED ribbon lighting have an adhesive backing. Peel off the backing and carefully adhere the dimmable LED tape to the prepared surface. Apply gentle pressure to ensure a secure bond.
-
Secure LED power supply and LED controller: Mount the power supply and controller in a safe and accessible location. Ensure proper ventilation for the power supply.
-
Cable Management: Use cable clips or ties to neatly organize the wires.
4. Testing:
-
Power On: Plug in the power supply and turn on the connectable LED strip lights.
-
Check for functionality: Verify that all LEDs are working correctly. For addressable RGB light strip, test the controller's functions.
-
Adjust as needed: If any adjustments are needed, make them before permanently securing the installation.
5. Important Considerations and Tips:
-
Voltage matching: Ensure that the voltage of your modern strip lights matches the output voltage of your power supply (e.g., LED strip 5m 12V with a 12V power supply). Using the wrong voltage can damage the LEDs.
-
Wattage calculation: Calculate the total wattage required by your bendable LED strip (watts per meter/foot multiplied by the total length) and choose a power supply with sufficient wattage capacity (it's generally recommended to have a power supply with at least 20% more capacity than needed).
-
Polarity: Always pay close attention to the positive (+) and negative (-) markings on the bulk LED strip lights, connectors, and power supply. Incorrect polarity will prevent the lights from working.
-
Maximum run length: Be aware of the maximum continuous run length recommended by the LED strip manufacturer. Longer runs may require additional
By following these steps and taking necessary precautions, you can successfully install LED strip lights and enjoy their versatile illumination.
Wrapping Up
Yes, LED strip lights can typically be cut at designated cut marks, usually indicated by scissors icons or copper pads. To connect cut sections or multiple LED strips, you can use solderless connectors for a quick and easy method, ensuring correct polarity. Alternatively, for a more permanent and secure connection, you can solder the copper pads together, again paying close attention to the positive and negative markings. Jumper cables can also be used to bridge gaps or navigate corners between LED light strips sections.
FAQ
Can I cut my LED strip lights anywhere?
No, you should only cut LED strip lights at the designated cut marks. These are typically indicated by a scissors icon or visible copper pads along the strip. Cutting elsewhere can damage the circuit and prevent sections from lighting up.
How do I know where the cut marks are on my LED strip lights?
Look for small scissors symbols printed on the LED strip or exposed copper pads, often appearing in regular intervals (e.g., every few LEDs). These marks indicate safe places to cut.
What tools do I need to cut LED strip lights?
A sharp pair of regular scissors is usually sufficient for cutting LED strip lights.
What happens if I cut my LED strip lights in the wrong place?
Cutting outside the designated marks will likely damage the electrical circuit of that section of the LED strip, preventing the LEDs beyond the cut from lighting up.
Can I reconnect a piece I accidentally cut off incorrectly?
It's difficult and not recommended to reconnect a section cut outside the designated marks. You're better off using the remaining good sections.
How can I connect two pieces of LED strip lights together?
There are two main methods:
Solderless Connectors: These are clips that snap onto the cut ends of the LED strips, providing an easy electrical connection.
Soldering: This involves using a soldering iron and solder to physically join the copper pads of the two LED strips.
Solderless Connectors: These are clips that snap onto the cut ends of the LED strips, providing an easy electrical connection.
Soldering: This involves using a soldering iron and solder to physically join the copper pads of the two LED strips.
Are solderless connectors reliable?
Solderless connectors are generally reliable for many applications and offer a quick solution. However, soldered connections tend to be more secure and less prone to disconnection, especially in environments with movement or vibration.
How do I use solderless connectors for LED strip lights?
Open the connector, slide the cut end of the LED strip under the clamps (ensuring the copper pads align with the connector's contacts and the polarity is correct), and then snap the connector shut to secure the connection.
Do I need any special tools for solderless connectors?
No, solderless connectors typically don't require any special tools.
How do I solder LED strip lights together?
You'll need a soldering iron, solder, and potentially some flux. Clean the copper pads, apply a small amount of solder to each pad, then carefully align the pads and heat them with the soldering iron until the solder melts and joins the two LED strips. Ensure correct polarity.
What is polarity and why is it important when connecting LED strips?
Polarity refers to the positive (+) and negative (-) terminals of an electrical circuit. LED strip lights are polarity-sensitive. Connecting them with incorrect polarity will prevent them from lighting up. Always match the positive to positive and negative to negative when connecting LED strips.
Can I connect different types of LED strip lights together (e.g., single color to RGB)?
It's generally not recommended to directly connect different types of LED strip lights as they have different wiring and control requirements.
Can I connect LED strips around corners?
Yes, you can connect LED strips around corners using:
Bending: Gently bend the flexible LED strip (avoid sharp creases).
Corner Connectors: Specialized solderless connectors designed for right angles.
Jumper Cables: Short wires with connectors that bridge the corner.
Cutting and Reconnecting: Cut the LED strips and use solderless connectors or soldering to join them at the desired angle.
Bending: Gently bend the flexible LED strip (avoid sharp creases).
Corner Connectors: Specialized solderless connectors designed for right angles.
Jumper Cables: Short wires with connectors that bridge the corner.
Cutting and Reconnecting: Cut the LED strips and use solderless connectors or soldering to join them at the desired angle.
Do I need to worry about the voltage when connecting LED strips?
Yes, ensure that all your LED strips and power supply have the same voltage (e.g., 12V to 12V).
Can I connect multiple LED strips in a long series?
Yes, but be mindful of potential voltage drop over long distances. For very long runs, you might need to power the LED strip from multiple points or use an LED amplifier.