2025-03-25
How to Put LED Strip Lights Around Corners?
How to Easily Install LED Strip Lights Around Corners? LED lighting strips are becoming increasingly popular in home décor and lighting due to their versatility. Not only are they energy-efficient, but they can also create a variety of atmospheres, adding a touch of brilliance to any space. However, for many DIY enthusiasts, dealing with how to install LED strip lights around corners can be a common challenge. How can linear strip light achieve a smooth transition along the edges of walls, ceilings, or furniture? This article aims to provide a comprehensive guide, introducing various installation methods, practical tips, and creative applications to help you easily handle how to install LED strip lights on ceiling corners.
Quick Look
Why Proper LED strip light installation is Important for Seamless Lighting?
How to install LED tape light for Corner Installation
Installing LED strip lights Challenges Around Corners
Install LED tape light Tips
Choosing the Right LED Strip Lights, led strip connector and led power supply
Installing LED strip Creative Ideas for Corner Applications
FAQ
Conclusion
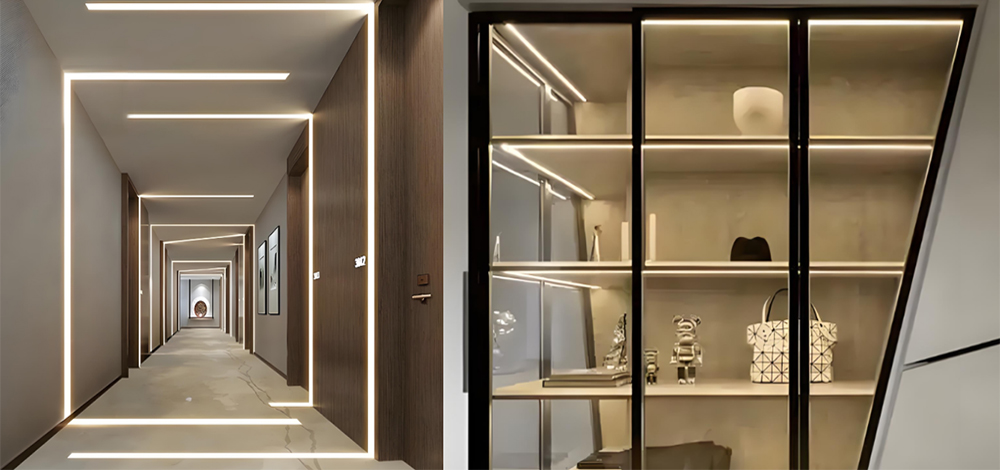
Why Proper LED strip light installation is Important for Seamless Lighting
In practical applications, LED strip lights often need to be installed around corners, edges, or complex structures. If not installed properly, it can impact the overall lighting effect and shorten the lifespan of the best lightstrip.
-
Prevent Light Interruption and Maintain Uniform Illumination
Incorrect corner installation may cause light discontinuity, creating dark spots or shadows that affect the overall aesthetics.
By using proper installation methods, such as corner connectors or carefully bending the LED strip, you can ensure consistent lighting, resulting in a smooth and natural illumination effect.
-
Prevent Damage and Extend Lifespan
Bending LED strips at sharp angles can damage internal circuits or solder joints, leading to partial LED failure or the entire strip malfunctioning.
Proper installation methods, such as using L-shaped connectors or cutting and soldering, help reduce mechanical stress, protect the LED structure, and extend its lifespan.
-
Enhance Aesthetic Appeal and Professionalism
In commercial lighting or home décor, consistent and seamless lighting directly impacts the visual effect.
how to bend LED strip around corners properly can conceal wiring and prevent lighting inconsistencies, making the overall lighting design more cohesive and professional.
-
Avoid Voltage Drop and Uneven Brightness
In long LED strip installations, corners can become key points where voltage loss occurs, leading to dimmer lighting in those areas.
Using 24V LED strips or a constant current driver can help minimize voltage drop issues and maintain uniform brightness across the entire strip.
How to install LED tape light for Corner Installation
There are several ways to installing LED strip lights around corners, each with its own advantages and disadvantages. These Common Methods for LED strip lights installation corners are suitable for different scenarios and personal preferences.
Method 1: Using L-Shaped Connectors
L-shaped connectors are a simple and cost-effective solderless connection option specifically designed for 90-degree right-angle corners. These connectors come in various types, including white polycarbonate connectors, flexible cable connectors (suitable for angles greater than 90 degrees), snap-on connectors, pin connectors, and even waterproof connectors with IP ratings. Using L-shaped connectors is a clean and professional installation method, especially suitable for beginners who prefer not to solder.
Installation Steps:
First, measure the length of the LED decorative strip lights needed and locate the marked cutting points on the linkable LED strips where you need to make a corner. LED light white strips usually have scissor icons or marked copper pads on the circuit board indicating where to cut. Be sure to cut at these points to avoid damaging the circuit.
Open the L-shaped connector and insert the cut ends of the LED stripe white into each side of the connector. When inserting, make sure to align the copper pads on the white LED strip light with the metal contacts inside the connector to ensure a good connection. For 24V LED strip RGB, also pay attention to the correct polarity.
Close the connector's buckle or locking mechanism to secure the 24V DC LED strip lights. Some connectors may require pressing down or sliding a lock.
Peel off the adhesive backing on the 24V strip LED light and stick the connected LED 24V strip lights along the planned path onto the surface. When sticking, press firmly to ensure the 24VDC LED strip lights is securely attached.
Advantages:
Provides a neat and professional installation appearance.
Simple and convenient to operate, usually without the need for soldering.
For waterproof white LED strip, it can maintain their waterproof performance.
Minimal gap at the connection point, resulting in a more visually continuous look.
No risk of short circuits when used correctly.
Very suitable for precise 90-degree right-angle corners.
Disadvantages:
Requires purchasing additional connectors, increasing the cost.
Mistakes when cutting and joining LED strip lights can lead to waste.
Not suitable for rounded edges or non-90-degree corners (unless using flexible cable connectors).
Connectors may loosen over time if not installed firmly.
Required Tools and Materials:
high quality LED strip lighting, L-shaped connectors, sharp scissors.
Method 2: Bend LED Strip
For LED strip lights flexible, you can directly bend them to fit around corners. This method eliminates the need for extra connectors and can achieve a smoother visual effect. However, it's important to be careful when bending to avoid excessive bending or creases, which can damage the internal circuitry of the flexible LED tape light.
90-Degree Fold (Corner Fold)
This method can create a professional 90-degree angle without any additional tools.
Locate the point where you need to bend.
Bend LED strip Lights backward (opposite to the corner direction) at a 45-degree angle.
Bend LED strip forward again to form a 90-degree angle.
Press down firmly on the fold to make it neater.
If needed, use a small amount of super glue to secure the fold.
Advantages: Professional appearance, no additional tools required.
Disadvantages: May damage the rohs LED light strips if not done carefully, not suitable if an LED is exactly at the bending point, may not be suitable for outdoor waterproof LED strip lights.
Required Tools and Materials: flexible strip lights, optional super glue.
90-Degree Pitch or Ribbon Bend
This method is easier for those strip lighting installation for the first time and also doesn't require extra tools.
Place the 24V DC LED strip flat on a smooth surface.
Identify the bending point and twist the 24V LED strip in a looping style.
Curl it tightly to change direction.
Use super glue or adhesive tape to secure the looped part to the surface.
Advantages: Easier than the corner fold, especially for beginners, no extra tools needed, suitable for areas where the bend is not easily visible.
Disadvantages: Appearance may not be as neat as other methods, risk of damaging the LED if it's at the bending point, may damage the waterproof coating.
Required Tools and Materials: 12V or 24V LED strip, super glue or adhesive tape.
Accordion Fold
This method is suitable for rounded corners or angles greater than 90 degrees, creating a gradual curve effect.
Make small accordion-like folds on the DC LED strips at equal intervals where you need to bend.
Use glue or adhesive tape to secure each fold.
Advantages: Suitable for rounded corners and angles greater than 90 degrees, can create smooth curves.
Disadvantages: Higher risk of damaging LED beads, more time-consuming, may not be suitable for precise angles.
Required Tools and Materials: China strip, glue or adhesive tape.
90-Degree Pinch
This is a simple and quick method that involves bending the DC12V LED strip 90 degrees and then securing it with super glue.
Advantages: Simple and quick.
Disadvantages: Appearance may not be as neat as other methods, may put stress on the strip.
Required Tools and Materials: LED strip lights 12V, super glue.
Method 3: Cutting and Using Jumpers
If your LED strip light china are not very flexible, or if you want to leave a gap at the corner, you can use the cut-and-jump method. This can be done using jumper connectors or by soldering wires.
Using Jumper Connectors:
At the point where you need to make a corner, cut the shenzhen LED strip lights along the marked cutting line.
Connect the two ends of the jumper connector to the cut ends of the two premium LED strip lights pieces.
Jumper connectors usually have flexible wires between them that can be bent to fit the corner.
Advantages: Suitable for weatherproof strip that are not easy to bend, flexible angles.
Disadvantages: Some types of connectors may require soldering (although solderless options are also available).
Required Tools and Materials: good LED light strips, jumper connectors, sharp scissors, optional soldering tools and solder.
Using Wires and Soldering
Cut cuttable LED light strips at the point where you need to make a corner.
Solder wires to the copper pads of the cut ends of the two low voltage light strips pieces.
Connect the wires, leaving enough slack to allow for bending.
Advantages: The most secure connection, suitable for all types of interior light strips, customizable angles and distances.
Disadvantages: Requires soldering skills and equipment, more time-consuming.
Required Tools and Materials: top rated LED light strips, wires, soldering tools, solder, wire strippers, sharp scissors.
Method 4: Using Pre-Bent LED Strips
There are also pre-bent strip LED lights available on the market that are specifically designed for corner installation. These red LED strip can be installed directly without any cutting or bending, greatly simplifying the installation process.
Advantages: The simplest solution, no cutting or bending required.
Disadvantages: Limited selection, may not fit all sizes or angles of corners, may be more expensive.
Required Tools and Materials: Pre-bent LED tape light.
Method 5: Installing LED tape lights in Profiles
For installations that require a more professional and refined look, LED tape strip lights can be installed in aluminum profiles (channels) with diffusers. The profiles can be bent at corners or mitered at a 45-degree angle for a seamless transition.
Advantages: Neat and beautiful appearance, can protect the LED tape lighting, helps with heat dissipation.
Disadvantages: More complex installation, requires purchasing profiles, may not be suitable for all scenarios.
Required Tools and Materials: best LED tape lights, LED profiles, mounting clips or glue, miter saw (if needed to cut profiles).
Method 6 ZIG ZAG Strip — Flexible Bending for Creative Lighting
The S type LED strip, also known as the ZIG ZAG Light Strip, boasts outstanding bending resistance, with a maximum bending angle of 90°, far superior to traditional SMD 2835 LED strips. Its flexible bending capabilities make it ideal for various signage and advertising applications, particularly on irregular surfaces and complex patterns.
Advantages of Zig Zag LED Strip
✔ 90° Flexible Bending allows for smooth horizontal curves.
✔ Adapts to Complex Shapes, easily bending around letters, logos, and other irregular surfaces.
✔ Strong Bending Resistance, allowing repeated use without losing performance.
✔ Creative Lighting Design, helping to create unique visual effects and enhancing the appeal of advertisements.
✔ Slim Profile for easy installation in various applications.
✔ Long Lifespan and Durability, reducing maintenance costs.
✔ Perfect for Corner Installations, easily overcoming the challenge of covering difficult corner areas where traditional LED strips might fail.
✔ Adapts to Complex Shapes, easily bending around letters, logos, and other irregular surfaces.
✔ Strong Bending Resistance, allowing repeated use without losing performance.
✔ Creative Lighting Design, helping to create unique visual effects and enhancing the appeal of advertisements.
✔ Slim Profile for easy installation in various applications.
✔ Long Lifespan and Durability, reducing maintenance costs.
✔ Perfect for Corner Installations, easily overcoming the challenge of covering difficult corner areas where traditional LED strips might fail.
Disadvantages of ZIG-ZAG LED Strips in Corner Installations
❌ Uneven Lighting: In extremely tight or sharp corners, the lighting may appear uneven, affecting the overall lighting effect.
❌ Installation Complexity: Although the S shape LED strip is flexible, installing it in small, hard-to-reach corners may still prove challenging.
❌ Concentrated Pressure at Corners: Excessive bending in corner installations may put too much pressure on the material, potentially shortening its lifespan.
Despite these challenges, the S-shaped flexible LED strip remains an excellent choice for signage, advertising displays, and creative lighting, especially in environments that require flexibility and precise bending.
Installing LED strip lights Challenges Around Corners
When install under cabinet lighting around corners, several challenges may arise, affecting both the installation process and the final lighting effect. The most common issues include bending difficulties, potential damage, and inconsistent illumination. Understanding these challenges can help ensure a smooth and long-lasting installation.
Bending Difficulties: Maintaining Proper Flexibility
Sharp Angles: LED strip lighting are designed to be flexible, but bending them at sharp angles can be problematic. If forced into a 90-degree turn, the best strip lighting LED may not lay flat, leading to improper adhesion and an uneven look.
Limited Flexibility in Some Models: Not all most efficient LED strip have the same level of flexibility. Rigid PCB designs or waterproof LED light strips may be harder to bend without causing internal stress.
Solution: Use corner connectors or gradually curve the LED tape instead of making an abrupt turn. Some 12 volt LED tape light can also be cut and reconnected with soldering or connectors to navigate corners smoothly.
Risk of Breaking: Preventing Physical Damage
Internal Circuit Damage: Excessive bending or repeated flexing can break internal solder joints or circuits, causing LED segments to stop working.
LED tape waterproof Are More Fragile: Silicone or epoxy-coated waterproof LED strips are more prone to cracking or peeling at bending points.
Solution: If bending is required, ensure that the bend radius is within the LED 12V light strips’s specifications. For tight angles, cut the strip and use L-shaped connectors or soldering instead of forcing a sharp bend.
Inconsistent Lighting: Preventing Dark Spots or Shadows
Uneven Light Distribution: When LED strip lights 12V are improperly bent, some LEDs may point away from the intended lighting direction, creating shadows or dim spots.
Voltage Drop at Corners: In long commercial LED strip lights installations, corners may introduce resistance, leading to voltage drop and reduced brightness in certain areas.
Solution: To ensure uniform lighting:
Use continuous lighting strips without excessive bends or breaks.
Select high quality LED lights with consistent brightness output.
If using connectors, make sure they are well-connected to prevent power loss.
For long runs, consider 24V or constant current LED strips to minimize voltage drop.
Install LED tape light Tips
To ensure smooth best LED light strips installation and achieve the best results, here are some practical tips:
Plan Ahead
Before starting the installation, be sure to carefully measure the total length needed, including all corners, and plan the route of LED strip under counter.
Choose the Right kitchen LED tape lights: Select the appropriate flexibility, brightness (lumens/foot ), color temperature (), and whether they are for indoor or outdoor use (IP rating ) based on your needs.
Prepare the Surface
Clean the installation surface thoroughly. Wiping with alcohol can remove dust and grease, ensuring the adhesive tape on the back of the strip lights can adhere firmly.
Bend Carefully
Avoid bending COB LED strip at sharp angles, as this can damage the circuit. If bending is necessary, try to maintain a gentle curve and refer to the manufacturer's recommended minimum bending radius.
Cut at Designated Points: Only cut the LED tape lights at the marked cutting lines.
Pay Attention to LED Power Supply
Ensure the voltage of the power adapter matches the voltage requirements of the LED light light strip and has sufficient power (it is recommended to leave a 20% margin ). For longer strips, consider the issue of voltage drop.
Test Connections: Before permanent installation, be sure to test all connections to ensure they are working properly.
Use High-Quality Adhesive Tape: If the adhesive tape on the light strip is not sticky enough, consider using high-quality double-sided tape or mounting clips to enhance the fixing effect. Foam tape may not be suitable for all surfaces.
Consider Heat Dissipation
For high-power LED lights strip lights, especially at bends, consider using aluminum profiles or heat sinks to help dissipate heat and extend the lifespan of the LED and lights.
Leave Space for Maintenance
When installing, consider that the power adapter and connections may require maintenance or inspection, ensuring they are easily accessible.
Pay Attention to Safety
Be sure to disconnect the power before performing any installation or modification operations. Use appropriate tools and follow relevant electrical safety regulations.
Common Problems and Solutions for LED Strip Light Corner Installation
During the corner installation of under cabinet lighting, you may encounter some common problems. Here are some solutions:
Light Leakage at Corners: This may be due to misalignment of the connector or an insufficient bending radius.
Solution: Adjust the position of the LED shop lights in the connector or increase the bending radius.
Uneven Brightnes: May be caused by sharp bends restricting light output or voltage drop due to long-distance installation.
Solution: Use gentle bends, ensure sufficient power supply, or consider dividing long white LED light strips into sections and powering them from both ends.
Damage to small LED strip at Bends: This is caused by excessive bending or bending at the wrong location.
Solution: Avoid sharp bends, use correct bending techniques, and ensure the strip is flexible enough.
Loose Connections: Can cause flickering or intermittent lighting.
Solution: Ensure the connector is properly locked or the soldered connection is firm. Test all connections before final installation.
Flickering Lights: May be due to poor connections, insufficient power, or using an incompatible dimmer.
Solution: Check all connections, ensure the power supply meets the requirements, and use a dimmer compatible with LEDs if dimming is needed.
Some LEDs Not Lighting Up: May be caused by physical damage, poor soldering, or manufacturing defects.
Solution: Check for any visible damage or loose connections. If a section of LEDs is not working, it may need to be replaced or reconnected.
Insufficient Adhesive Stickiness: The 12 volt LED strip lights may fall off due to dust, moisture, or poor adhesive quality.
Solution: Clean the surface thoroughly before installation. Use additional high-quality double-sided tape or mounting clips.
Choosing the Right LED Strip Lights, led strip connector and led power supply
Choosing the right LED strip lights and accessories is crucial for successful corner installation.
Flexibility
For installations requiring bending, choose flexible LED tape cabinet lighting and pay attention to the width of their PCB board. Also consider the manufacturer's recommended minimum bending radius.
Width Compatibility
If using connectors, ensure the connector width matches the width of the blue LED strip lights (e.g., 8mm, 10mm, 12mm).
Brightness
Choose the appropriate brightness (lumens/foot) based on the application scenario (ambient lighting, task lighting, accent lighting) and the size of the space.
|
Application Scenario
|
Lumens/Meter
|
|
Ambient/Mod Lighting
|
300-100
|
|
Under Cabinet Lighting
|
580-1750
|
|
Task Lighting(Close)
|
930-1450
|
|
Task Lighting(Far)
|
1600-3000
|
|
Indirect Lighting(Room, Bedroom etc)
|
1250-1870
|
|
Industrial/Signage
|
1600-3160
|
Color Temperature
Select the appropriate color temperature (Kelvin) to create the desired atmosphere (warm white for cozy, cool white for bright).
Waterproof Rating
If installing in damp or outdoor areas, choose LED tape strip lights with the corresponding IP rating.
Connector Type
Choose the appropriate connector type based on the corner angle (L-shaped for 90 degrees, cable connectors for flexible angles), whether soldering is required, and whether waterproofing is needed.
Power Supply
Choose a power adapter with the correct voltage and sufficient power to meet the total length requirements of the LED rope light used.
Installing LED strip Creative Ideas for Corner Applications
LED diffuser strip have a wide range of applications in corners, adding unique creativity and beauty to the home environment.
Ceiling Cove Lighting
Install LED strip lights for ceilings along the edges of the ceiling or in custom-made coves to provide indirect ambient lighting. Use connectors or careful bending to achieve a seamless transition at corners.
Under Cabinet Lighting
Install under cabinet strip lighting to provide practical task lighting for countertops. Using L-shaped connectors can make corner installations look neater.
Backlighting
Place tv backlight LED strip lights behind TVs, computer screens, or mirrors to create a soft ambient light and reduce eye strain. Corners behind objects can be easily handled.
Stair Lighting
Install LED strip lights for stair lights along the sides of stairs or under the steps to provide both safety lighting and aesthetic appeal. Corner installations on stair landings require careful planning and execution.
Display Cabinet Lighting
Use LED strip lights inside glass display cabinets or shelves to highlight collectibles or decorations. L-shaped connectors are ideal for neat corner installations inside cabinets.
Under Bed Lighting
Install LED strip lighting under the bed to create a subtle and stylish night light effect.
Wall Decoration
Use LED light strips to create unique patterns on walls or highlight architectural features. Corners can be cleverly incorporated into the design.
Outdoor Lighting
Use outdoor LED strip lights waterproof to illuminate garden paths, patios, or architectural details. Pay attention to smooth transitions at corners for a seamless look.
FAQ
How to make LED strips go around corners?
When installign LED strip lights around corners, you can gently bend them, use L-shaped LED connector for a seamless turn, or cut and solder wires for a custom fit. Looping the dimmable LED strip lights is another option for flexible installations. Choose the best method based on your lighting project needs!
Can you twist LED strips?
Standard LED smart strips can be gently twisted, but excessive twisting may damage the circuit and affect performance. For sharp turns, it's best to use corner connectors or cut and rejoin the COB LED strip light. However, zig zag LED strip are designed to be twisted or folded easily.
How to attach a LED light strip to a wall?
To attach an LED light strip to a wall, use its adhesive backing on a clean, dry surface or reinforce it with double-sided tape for better grip. For extra support, mounting clips or aluminum channels provide a more secure and professional installation. Choose the best method based on your wall texture and setup needs!
Where not to put LED lights?
Avoid placing LED strip lights 12V waterproof in areas with high heat or moisture, such as directly above stoves, in unventilated spaces, or near water sources like sinks and showers. Additionally, avoid placing them in areas with excessive dust or direct exposure to harsh chemicals, which can affect their performance and lifespan.
Are LED strip lights safe for bedrooms?
Yes, LED light strips in bedroom,producing minimal heat, are energy-efficient, and have low voltage, making them safe for use in living spaces. Just ensure they are properly installed, especially when using adhesive backing, to avoid any potential fire hazards.
How to bend a LED strip in a corner?
To bend dimmable strip LED around a corner, you can gently flex LED strip light if it's flexible, ensuring not to damage the circuit. For sharp corners, use corner connectors to maintain a clean, secure connection. Alternatively, cut and solder the smart LED light strip to create a smooth turn.
How do you cut LED strips for corners?
To cut LED tape lights for corners, first identify the marked cutting lines on the LED dimmable strip. Use sharp scissors or a knife to cut along these lines, ensuring you don't damage the circuit. After cutting, you can use corner connectors or solder wires to join the strips at the corner.
Can you bend LED light strips on Reddit?
Yes, you can bend flexible LED strip light around corners, but it's important to avoid sharp bends that could damage the best LED tape or affect its performance. For tight corners, consider using corner connectors or cutting and connecting LED light strips for a smoother transition. Make sure to follow the manufacturer's guidelines for safe bending.
How to bend Philips Hue around corners?
To bend Philips Hue light strips around corners, gently curve the commercial LED tape light along the desired path, making sure not to force any sharp bends. Philips Hue strips are flexible, but for sharp corners, it's recommended to use the official corner connectors designed for the product. These connectors ensure a secure and smooth bend while maintaining the light strip's functionality.
How to get LED strip lights to go around corners?
Yes, it's generally safe to bend LED LED lighting strips, but they should be bent gently along their flexible sections to avoid damaging the circuit. For sharp bends, it's better to use corner connectors or cut and joining LED strip lights. Always follow the manufacturer's guidelines for bending to ensure safety and preserve the strip's performance.
Conclusion
Commercial LED strip lights are a highly creative and practical home lighting solution. While corner installation may seem a bit tricky, by mastering the various methods and tips introduced in this article, you can easily handle all types of corners and add unique charm to your home environment. Whether you choose to use convenient connectors, try flexible bending techniques, or adopt more professional cutting and jumper methods, the most important thing is to make a choice based on your specific needs, skill level, and preferences. We hope this article will help you confidently start your LED strip lights installation project and ultimately enjoy the wonderful changes that LED lighting brings to your home.